Your first scheduled task
By the end of this tutorial you’ll have a scheduled job in your workspace that runs an agent on its own — daily, weekly, or at any custom interval. You’ll see the next run time on the schedule list, and once the time arrives the agent runs without you opening anything.
This is the last tutorial in the Getting started series. It takes about 5 minutes.
Before you start
- You’ve completed Tutorial 4 — Your first agent or at least one published agent already exists in your workspace.
- You’re signed in at https://store.no-downtime.com .
A scheduled task runs one agent at a recurring time. Think of it as a recurring calendar event whose attendee is your AI employee. Common examples:
- A daily summary of yesterday’s support tickets, posted to Slack at 9 AM.
- A weekly check of competitor pricing, emailed to the marketing manager every Monday.
- A monthly compliance report, generated on the first of the month.
Step 1 — Open the Schedules tab
- In the left sidebar, click Automation.
- At the top of the page, click the Schedules tab (next to Flows).
You land on the list of scheduled jobs in your workspace. Each row shows the job name, the agent it runs, the recurrence (every day at 09:00, every Monday, etc.), and the next run time.
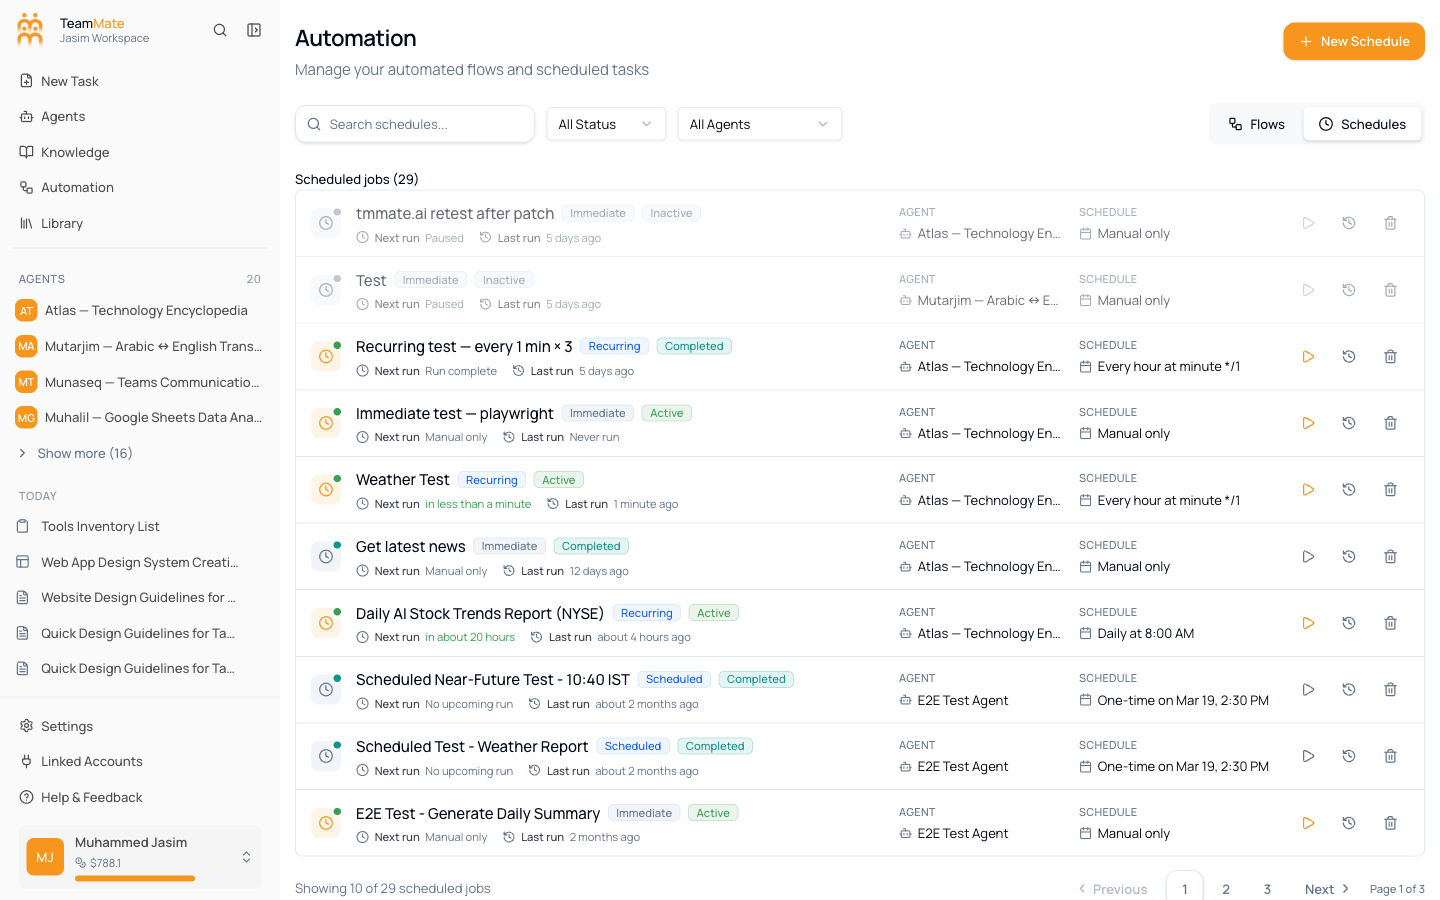
If the list is empty, that’s expected — you’re about to add the first one.
Step 2 — Create a new schedule
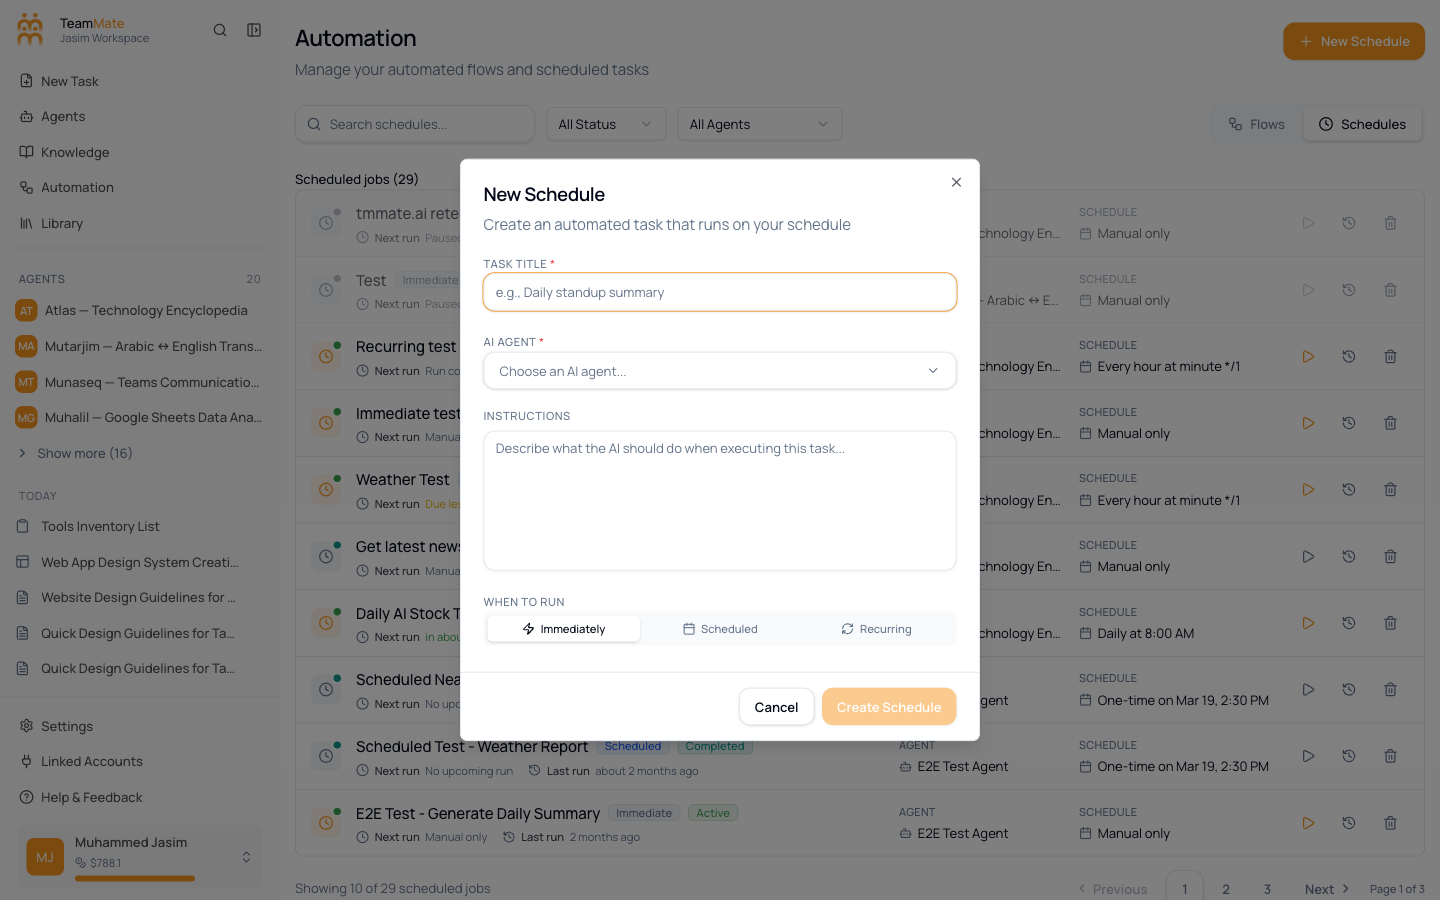
- At the top-right of the page, click New Schedule.
- A dialog opens with the schedule’s settings: name, agent, recurrence, prompt, and (optionally) where to send the result.
Step 3 — Name the schedule
-
In the Name field, type something readable. The name shows up in the upcoming-runs list and in the execution history.
Good names: “Daily Sales Summary”, “Weekly Competitor Pricing Check”, “Monthly Compliance Report”.
Less good: “test”, “schedule 3”, “agent thingy”.
Step 4 — Pick the agent
- In the Agent dropdown, pick which agent the schedule should run.
- Any published agent in your workspace is in the list. If the agent you want is greyed out, it’s still in Draft — go publish it first (Tutorial 4, step 9).
If you don’t have a fitting agent yet, you can pick a generalist like the HR Assistant or one of the built-in specialists, and just give it a clear prompt in step 6.
Step 5 — Set the recurrence
The recurrence tells TeamMate how often to run the job. You have two ways to set it:
Quick presets
Most of the time these are all you need:
- Daily at <time> — runs once every day at the chosen hour and minute.
- Weekly on <day(s)> — runs on the day(s) you tick (e.g. Monday, Wednesday, Friday).
- Monthly on <day-of-month> — runs on a specific day each month (1st, 15th, last day, etc.).
Pick the preset that matches your need, then choose the time. All times are in your workspace’s configured timezone — set this under Settings → Workspace General if you haven’t already.
Custom cron expression
If you need something irregular (“every two hours, but only on weekdays”), click the Custom / Cron option and enter a five-field cron expression:
minute hour day-of-month month day-of-weekExamples:
| Expression | Meaning |
|---|---|
0 9 * * 1-5 | Every weekday at 9:00 AM |
0 */2 * * * | Every 2 hours, on the hour |
0 9 1 * * | At 9:00 AM on the 1st of every month |
30 14 * * 1,3,5 | Mon/Wed/Fri at 14:30 |
If you’ve never written cron before, stick to the presets.
Step 6 — Write the prompt
The prompt is what the agent receives when the schedule fires. Treat it like a single message you’d send the agent in chat.
- Be specific about the outcome. “Summarise yesterday’s ticket activity in bullet points, grouped by priority” beats “summarise tickets”.
- Mention the format if it matters. “Reply as a Slack message” or “Reply as a short email subject line + body” both shape the output.
- Reference time relatively, not absolutely. “Yesterday’s tickets”, “this week”, “the last 7 days” — these resolve to the agent’s actual run time, so the prompt stays correct forever.
Example for a daily HR-policy reminder:
Pick one TeamMate HR policy at random. Summarise its key points in 3 bullets. Sign off with “Have a great day.”
Step 7 — Choose where the result goes (optional)
Some schedule dialogs let you pick a delivery channel for the result — email, Slack, Teams, or just “save in the execution log so I can see it later”. Pick one:
- In the execution log only — quickest. The output is visible when you click into the schedule from the Schedules list.
- Email — sends the output to one or more email addresses. Good for daily digests you read with morning coffee.
- Slack / Teams — posts the output to a channel. Needs the integration to be connected first (Integrations).
If the dialog doesn’t show this option (some schedules deliver in-app only), just skip — you can read the output from the execution log either way.
Step 8 — Save the schedule
- Click Save.
- The dialog closes. Your new schedule appears in the list with a Next run time.
- The state should show Active. If it’s Paused, click the toggle to activate it.
Step 9 — Verify the first run
Don’t wait until tomorrow to find out something’s wrong. Most schedule dialogs have a Run now option:
- Find your new schedule in the list.
- Click the ⋯ menu on its row, then Run now (or click the ▶ Execute button if it’s visible).
- The schedule runs immediately, in addition to its regular cadence.
To read the result:
- Click the schedule’s row to open its detail view.
- Open the latest execution entry.
- You’ll see the prompt that was sent, the agent’s reply, and (if you set up delivery) confirmation that it was delivered.
If the output looks wrong, this is the moment to tweak — edit the prompt, save, then Run now again. Iterate until the output is what you’d want to see at 9 AM tomorrow.
What you built
- A scheduled job that runs an agent automatically, with no further input from you.
- A first manual execution proving the prompt produces useful output.
- A repeatable pattern you can copy for any “do X every Y” need in your team.
Editing a schedule later
Anything about a schedule can be changed without losing its history:
- Open Automation → Schedules.
- Click the schedule’s name.
- Edit the agent, prompt, recurrence, or delivery channel.
- Click Save.
The change takes effect on the next run.
Pausing or removing a schedule
- To pause: click the Active toggle on the row; it switches to Paused. The job stops running but keeps its history. Toggle back to Active to resume.
- To remove: open the row’s menu and click Delete. Past executions are preserved in the workspace audit trail, but the schedule won’t run again.
When the schedule doesn’t fire
- The next-run time hasn’t passed yet — the most boring reason and the most common. Wait, or use Run now.
- The state is Paused — toggle it to Active.
- The agent is in Draft — publish it. Schedules can only run published agents.
- The workspace ran out of credits — check Settings → Usage & Billing. Scheduled runs consume credits like any other agent call; if the balance is zero, runs are skipped and logged.
- The output is empty — the schedule ran but the agent produced nothing. Same checklist as a failing chat: check the prompt, check that knowledge is attached, check that the agent has enough context.
You’re done with Getting started
You now have:
- A working TeamMate account and workspace.
- Your team in the workspace with the right roles.
- A published agent doing something specific.
- A workflow running on demand.
- A scheduled task running without you.
That’s the full loop. From here, the rest of the docs are organised by what you want to do:
- Real business use cases — Guides (an SDR that books meetings, an invoice intake agent, etc.).
- Connecting external tools — Integrations (Slack, Teams, Google Workspace, Microsoft 365, Odoo).
- Looking up a feature — Chat, Agents, Knowledge bases, Workflows, Tasks.
- Governance and access control — Governance, Settings.
Welcome aboard.